
Friday, April 13, 2012

Dreaming in the Garden with Dreamweaver and Stampendous


Get ready to be inked, pasted, encrusted, stenciled and stamped! All of this week the Dreamweaver Stencils' Dream Team and the Stampendous Design Teams will be providing some "Dream-pendous" inspiration for you, with multiple opportunities to win some fabulous prizes from both companies. Each day this week, you will be directed from both the Stampendous Impressions' blog or the Dream It Up! blog to the players du jour for your oohing and aaahing pleasure. Everyone will be playing on Saturday, the 14th with our final hop for the week. This is your opportunity to see how to mix and mingle your creativity...if you are a stenciler, you will be fascinated at combining stamps with your first love. If you are a stamper, you will be wowed at how stencils can add to your impressions.

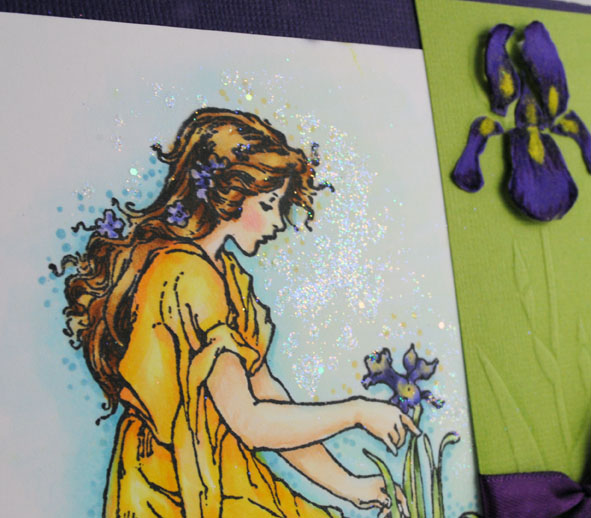
Are you thinking, "How can this possibly be the same person who created the wild gears piece on the first hop day?" Yep. It is. Like many paper-crafters, I tend to have multi-personality disorder when it comes to creating.

This new Cling Daffodil Girl image from Stampendous will be available online April 21st, but meanwhile...check your local stamp store! Isn't she gorgeous? I cannot begin to tell you how many Copic markers I used to color this piece, but I was pleased with the end result. I added some of the new Stampendous Crushed Glass Glitter in Fresh Green, and for a magical Secret Garden feel, I added a sprinkling of beautiful Multi Crystal Glitter in the background.

In keeping with the flower in the image, I machine-embossed a green panel using the Dreamweaver Stencils' Bearded Iris. I embossed it a second time on purple velveteen paper, cut out the petals, and adhered them dimensionally. Using a glue pen, I applied a smidge of Lemonade Yellow Fun Flock, too. Then I added some shading with my Copic markers. Gorgeous, huh?

If you've missed any of the previous days post for this hop, please continue to scroll down.

Be sure to leave comments as you tour the blogs (with your email addy!) for a chance to win* one of three combined sets of these Dreamweaver and Stampendous goodies:


Leave me some love before you "gear up" for the next player:


*For shipping and handling purposes, USA/APO/FPO/Canada winners only.

Thursday, April 12, 2012

Are You Here for the Dreamweaver/Stampendous Week Hop?

If you are here for the Dreamweaver/Stampendous Blog Hop post for Thursday, please scroll down...but take your time, there's more fun along the way!

Woodware UK For That 21st Birthday!


 Woodware UK challenged the team this week to create something for 21st birthday. Since that tends to be a big deal, especially in the US, I went for elegant. Not to mention, who doesn't love something in Tiffany Box Blue...even if it is just a card? For the background panel, I machine-embossed the Dreamweaver Stencils' Large Damask.  Then I broke out my oval die-cutting templates (Nestabilities) and cut several ovals. The larger aqua oval I placed under my acrylic stamping block so that I could see the shape. Then I placed the smaller scalloped oval image from the Woodware Dotty Frame over the top and adjusted it to match the oval die cut shape. Ordinarily, the shapes would have been slightly different, but with many larger clear stamp images, you can flex them to fit. Anyway, this one was stamped and embossed with Stampendous Midnight Black EP, the larges oval was stamped and embossed with Stampendous White EP, and cut out. The  very center section has the birthday sentiment from the Woodware Clear Jane's Script set. Then using some embossing tools, I embossed the *21* from the Dreamweaver Stencils' Lower Case Alphabet. Some fun polka dot Card Candi and Aqua Crystals were the finishing touch. All of this week, the Woodware UK girls are showing off their mad skills for this 21st birthday bash, so check them out through the links on the Woodware UK blog.


A Cuppa Roses With Dreamweaver and Stampendous!


Get ready to be inked, pasted, encrusted, stenciled and stamped! All of this week the Dreamweaver Stencils' Dream Team and the Stampendous Design Teams will be providing some "Dream-pendous" inspiration for you, with multiple opportunities to win some fabulous prizes from both companies. Each day this week, you will be directed from both the Stampendous Impressions' blog or the Dream It Up! blog to the players du jour for your oohing and aaahing pleasure. Everyone will be playing on Saturday, the 14th with our final hop for the week. This is your opportunity to see how to mix and mingle your creativity...if you are a stenciler, you will be fascinated at combining stamps with your first love. If you are a stamper, you will be wowed at how stencils can add to your impressions.


Since today is Thursday, and ordinarily I would be posting for this month's Dreamweaver challenge, I thought I'd, "Kill two birds with one stone", (boy, does that sound violent!), for today's post. The DW challenge is "May flowers", so I combined The Stampendous Cling Jumbo Cottage Rose** with the Dreamweaver Teacup. Remember my little "accident" from my post on Tuesday? This time I remembered to use the Matte Black Paste under the Crackle Paste...so no chunks falling off this time. After ink distressing the teacup with Memories Mists Pale Ale, I stamped the rose on tissue paper, colored with Copic markers, and decoupaged it onto the teacup with Beacon Adhesives' Fast Finish Decoupage. When dry, I trimmed away the excess. I stamped and embossed the same rose on the side of the violet card with Vintage Lilac Embossing Tinsel, and lined up the rose on the teacup to match. I added the new Cling Profile Portrait, stamped onto a presanded surface of Co'ordinations cardstock. The stenciled sentiment was added to a Nestie Ribbon Banner to finish off my answer to the floral challenge, as well as  using both Dreamweaver and Stampendous! Whew! Remember, you can play along with the DW team all this month, and link your floral creations to the Mr. Linky found HERE.


Be sure to leave comments as you tour the blogs (with your email addy!) for a chance to win* one of three combined sets of these Dreamweaver and Stampendous goodies:


Leave me some love before you "gear up" for the next player:


*For shipping and handling purposes, USA/APO/FPO/Canada winners only.

**This image from Stampendous will not be available on the website until April 21st. Meanwhile, check your local stamp store!

Wednesday, April 11, 2012

Dreamweaver and Stampendous For the Perfect Gent!


Get ready to be inked, pasted, encrusted, stenciled and stamped! All of this week the Dreamweaver Stencils' Dream Team and the Stampendous Design Teams will be providing some "Dream-pendous" inspiration for you, with multiple opportunities to win some fabulous prizes from both companies. Each day this week, you will be directed from both the Stampendous Impressions' blog or the Dream It Up! blog to the players du jour for your oohing and aaahing pleasure. Everyone will be playing on Saturday, the 14th with our final hop for the week. This is your opportunity to see how to mix and mingle your creativity...if you are a stenciler, you will be fascinated at combining stamps with your first love. If you are a stamper, you will be wowed at how stencils can add to your impressions.


My post for today is far simpler than the previous two days...I promise! And yet, just as fun. I created the background panel by paste-embossing in Glossy Black the Dreamweaver Houndstooth stencil. Using a stencil brush, I inked the new Art Nouveau Flourish in shades of gray, and added some white highlights with a gel pen. The Cling Gent** image was simply stamped in black on white cardstock, and shaded with Copic markers, cut out and adhered over the Nestie panel. The sentiment is from the Perfectly Clear Time Flies set from Stampendous. See? I told you it was simple!

Be sure to leave comments as you tour the blogs (with your email addy!) for a chance to win* one of three combined sets of these Dreamweaver and Stampendous goodies:


Leave me some love before you "gear up" for the next player:


*For shipping and handling purposes, USA/APO/FPO/Canada winners only.

**This image will not be available for purchase online until April 21st. Please check your local store for immediate availability.

Tuesday, April 10, 2012

Dreamweaver and Stampendous...a Happy Accident?


Get ready to be inked, pasted, encrusted, stenciled and stamped! All of this week the Dreamweaver Stencils' Dream Team and the Stampendous Design Teams will be providing some "Dream-pendous" inspiration for you, with multiple opportunities to win some fabulous prizes from both companies. Each day this week, you will be directed from both the Stampendous Impressions' blog or the Dream It Up! blog to the players du jour for your oohing and aaahing pleasure. Everyone will be playing on Saturday, the 14th with our final hop for the week. This is your opportunity to see how to mix and mingle your creativity...if you are a stenciler, you will be fascinated at combining stamps with your first love. If you are a stamper, you will be wowed at how stencils can add to your impressions.


Ever break an expensive Ming vase? Not a happy accident. But breaking a faux vase...a very happy accident! I had the notion of doing a crackle finish on the Dreamweaver Ginger Jar and stamping this Lone Bird image onto it. My steps went like this:
1. I taped the stencil on all four sides to a black panel with removable tape.
2. I applied Glossy Black Paste with the Spreader over the surface, and "squeegeeing" off the excess to save for another day.
3. I removed the tape from three sides, leaving a hinge piece before removing my pasted panel to dry. I cleaned my stencil and spreader immediately with warm water and a soft brush.
4. I placed my pasted piece on top of my toaster oven with it set on the lowest setting (150 degrees F) until dry, approximately 30 minutes.
5. I replaced the dry stencil over the surface. This time I pasted with the Crackle Embossing Paste, and followed above directions.
6. When dry and crackly, I inked color on to the surface with a stencil brush, and then stamped the image on the surface, and...uh, oh! This was where I found out that I had made a mistake. You see, the Crackle Paste adheres better to a matte paste rather than glossy. The result was that portions were breaking off. At this point, I could have thrown it away, but something in my scary brain went, "hmmm", and I was determined to "Make it work!" as Tim Gunn would say. So here's the rest of the steps:
7) I covered the entire surface with Versamark ink and used Deep Impressions Embossing Enamel over the entire surface...twice. This did two things: One...it provided a shiny ceramic-like look, and two...it ensured that no more pieces would fall out!
8) To finish the card, I machine-embossed the front with the Dreamweaver Stencils' Quatrefoil design, and brushed ink over the surface to highlight. I added a scrap of encyclopedia page (on canaries!), which I stamped with the Cling Vintage Birdcage**, and added the Cling Bird Manor** in the background. A band of crocheted lace from May Arts ties it all together.

Be sure to leave comments as you tour the blogs (with your email addy!) for a chance to win* one of three combined sets of these Dreamweaver and Stampendous goodies:


Leave me some love before you "gear up" for the next player:


*For shipping and handling purposes, USA/APO/FPO/Canada winners only.

**These items available on the Stampendous site April 21st. Check your local stores meanwhile.

Monday, April 9, 2012

Gearing Up With Dreamweaver and Stampendous...Day One


Get ready to be inked, pasted, encrusted, stenciled and stamped! All of this week the Dreamweaver Stencils' Dream Team and the Stampendous Design Teams will be providing some "Dream-pendous" inspiration for you, with multiple opportunities to win some fabulous prizes from both companies. Each day this week, you will be directed from both the Stampendous Impressions' blog or the Dream It Up! blog to the players du jour for your oohing and aaahing pleasure. Everyone will be playing on Saturday, the 14th with our final hop for the week. This is your opportunity to see how to mix and mingle your creativity...if you are a stenciler, you will be fascinated at combining stamps with your first love. If you are a stamper, you will be wowed at how stencils can add to your impressions.


Does this card look familiar? Well, while this card was still in bits and pieces, my son, Bryan, used those to put together the blinkie for this week's event. The end result of this card was a bit over the top, but I was having so much fun playing with the various elements from both companies. I edged with Aged Gold Embossing Enamel, I pasted the black panel with Matte Black Embossing Paste and then covered that with Aged Silver, Aged Gold, and Aged Copper Embossing Enamels. I covered the back of the acetate panel with Dreamweaver Color Solutions in Iceberg, Citron, and Sizzling Silver. When dry I spread Ranger Glossy Accents over the back and applied a crumpled piece of the backing tissue that the acetate came with. When dry, I stamped the new Patent Man image on the front with Black StazOn, applied more Glossy Accents and sprinkled Pearlized and Bronze Mica Flakes. The Dream panel was a piece of copper colored aluminum first run through my Big Shot with the Gears Stencil, then run through again to emboss the word. My extra "gears" are one piece of aluminum cut from an embossed piece with the same Gears Stencils, and one gear from the Gears background stamp, punched out and embossed in Aged Gold Embossing Enamel. I guess the end result is truly some "heavy metal", but I was pleased to be "rockin'" the DW/STM goodies.

Be sure to leave comments as you tour the blogs (with your email addy!) for a chance to win* one of three combined sets of these Dreamweaver and Stampendous goodies:


Leave me some love before you "gear up" for the next player:


*For shipping and handling purposes, USA/APO/FPO/Canada winners only.