Saturday, October 2, 2010

Oooops!

Best laid plans of mice and men...or paper-crafters. If you are here today for the Dreamweaver Stencil's blog hop...the dates were posted incorrectly as Sept. 30th-Oct. 2nd. In reality it was supposed to start on Oct. 1st through Oct. 3rd. Please come back again tomorrow as I have some really fun projects and tips to share with you. Meanwhile, be sure to visit the blogs that are hopping today, Laura, Lee, and Liz, before heading back to the Dreamweaver Stencil's site to choose your favorite stencil, embossing paste, and Metallic F/X and over to the Dream It Up! blog to post your wishes. Hope you win! If you missed those that hopped on Friday, be sure to head to them as well as listed on the Dream It Up! blog. Sorry for the miscommunication, but you know us paper-crafters...we're creative, not perfect!
Meanwhile, here is teaser of what I'll be posting tomorrow...so hop on over!
Pam

Wednesday, September 29, 2010

Dreamweaver Vintage Christmas Card

I'm so excited! This week we have our very first Dreamweaver Stencil's Dream Team blog hop! Starting on September 30th and going through October 2nd, each day a few of our team will be featuring their amazing talents using amazing stencils and products from Dreamweaver Stencils. Not only will you have the opportunity to learn some fun new tips & techniques, but by following the directions posted on the Dreamweaver Stencils "Dream It Up!" blog, you have the chance to win your favorite stencils and some additional goodies! My particular posting day is scheduled for October 2nd, so come hopping by on that day, but don't forget the previous two days with the other gals. We are spreading the love out over three days so that you have the time to thoroughly check out what we've been up to.
For this posting, I'm featuring two gorgeous new stencil designs, "Christmas Script" and "Holly Flourish". I paste embossed the Christmas Script using Metallic Gold Embossing Paste on a panel of red cardstock. I ink-stenciled the Holly Flourish on a white panel and lined it up with the red panel for the over-lap. Sponging ink around the edges adds to the vintage appeal of this card. Highlighting the gold writing, I added a thin gold punched border to the side. Tiny red Dot Sparklers were added for bling, and a couple of ribbon ties finish it off. Hope this card inspires you in your own holiday card-making!
Pam

"Christmas Script" from Dreamweaver Stencils (LL3009)
"Holly Flourish" from Dreamweaver Stencils (LG731)
Metallic Gold Embossing Paste from Dreamweaver Stencils (DGP)
Class A' Peel "Red Dot Sparklers" from Stampendous (AC672HSR) 
Olympia Green and Vintage Sepia Versafine ink from Tsukineko
Fiskar Border punch
corner rounder
Bazzill dark green cardstock
red linen, white cardstock
mirror finish gold cardstock

Sunday, September 26, 2010

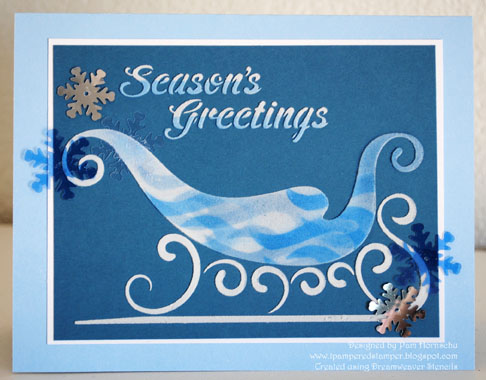
One Flaming Frosty Sleigh!


I'm so excited! This week we have our very first Dreamweaver Stencil's Dream Team blog hop! Starting on September 30th and going through October 2nd, each day a few of our team will be featuring their amazing talents using amazing stencils and products from Dreamweaver Stencils. Not only will you have the opportunity to learn some fun new tips & techniques, but by following the directions posted on the Dreamweaver Stencils "Dream It Up!" blog, you have the chance to win your favorite stencils and some additional goodies! My particular posting day is scheduled for October 2nd, so come hopping by on that day, but don't forget the previous two days with the other gals. We are spreading the love out over three days so that you have the time to thoroughly check out what we've been up to.
This posting of mine showcases one of the new stencils for the holidays, "Large Sleigh", which happens to have the sentiment as part of the design. This was paste-embossed on blue cardstock and when dry, the stencil was placed on again. I used removable tape to mask off the areas that I didn't want air-brushed. I used a piece of transparency and cut out a flame stencil. Using this and my Copic Airbrushing System, I did a flame job on Santa's sleigh. This technique is super easy, and could be done with actual flame colors as well. A sprinkling of snowflake sequins was the perfect embellishment. Pretty frosty, wouldn't you say?
Pam

"Large Sleigh" from Dreamweaver Stencils (LJ904)
White Embossing Paste from Dreamweaver Stencils (DEP)
Copic Sketch Markers-B24, B37, B95
Copic Airbrush System
Bazzill dark blue cardstock
white, light blue cardstock
snowflake sequins

Saturday, September 25, 2010

STMC25-Polar Blue Christmas

 Yippee! It's Stampendous Saturday Sketch challenge time again! This week our sweet-and-oh-so-talented Rachel designed the challenge that you see at the left. You have to go visit her blog and see her version...I'll give you a hint...it looks yummy! Play along with us and post your rendition to one of the online sites and link back to the Stampendous blog, and you could win one of two great prizes this week! Meanwhile, the deets on my example:
I stamped the Cling Snowflakes background using Frost White ColorBox on the blue card. Then I layered a panel of this beautiful K & Co. paper on white for pop. Two snowy hills were created using my favorite EK Border punch. Now the real fun begins! I stamped this darling polar bear with packages on smooth white cardstock and colored with my Copics (see colors at left). After I cut him out, I used a craft knife to cut around his
paws so they could be popped up a bit. I also cut into the fringe of the scarf and bent the ends to mimic flapping in the breeze. I tucked his little feet into the snowy hills on the card and embellished with a little glitter (of course!) and a fuzzy pompom on his hat. The sentiment was stamped, and a touch of color added, on a Nestie label and popped up with foam adhesive over the top of this cute plaid ribbon. I'm really happy with the way this turned out and thinking this may be one of my designs I send out to family and friends. Doesn't that make you want to adopt me? ;)
Pam

 "Cling Polar Christmas Set" from Stampendous (CRS2044)
"Cling Snowfall" from Stampendous (CRR122)
Multi Ultra-Fine Crystal Glitter from Stampendous (GM220U)
Frost White ColorBox from Clearsnap
Danube Blue Memento ink from Tsukineko
Copic Sketch Markers
Bazzill cardstock
white cardstock
K & Co. print
Nestabilities Labels 4
EK Border punch
ribbon, pompom (Michael's)
double-sided foam adhesive

Friday, September 24, 2010

Rockin'...Chickadees?

"They rock in the treetop all day long. Rockin' and a boppin' and a singin' their song..."! Now that I've planted that in your head for the rest of the day (heehee) I can share with you one of Stampendous' latest designs, "Chickadee" (yeah, I know, it should be a robin), and this great sentiment that actually comes in a Cling set with another image, but I thought it would be appropriate for this card as well. I stamped the Chickadee twice...once on the aqua cardstock and once on the polka dot print of aqua and red. The red ones were cut out and adhered to the aqua panel with double-sided foam tape for dimension, and their little wings were bent slightly as well (honest, it didn't hurt them a bit!). I stamped and embossed the sentiment in white on a section of a Nestie circle with a scalloped border. Another scalloped border was added to the polka dot panel at the bottom. A little bling is always a good thing, so a section of Scrollwork Border in red mirror finish and some red Dot Sparklers were the finishing touch. Happy holiday stamping!
Pam

"Cling Chickadee" from Stampendous (CRN232)
"Cling Family Tree Set" from Stampendous (CRS2050)
Frost White ColorBox from Clearsnap
Onyx Versafine from Tsukineko
Class A' Peel Dot Sparklers from Stampendous (AC672HSR)
Class A' Peel Scrollwork Borders from Stampendous (AC726MRR)
Bazzill Maraschino Cardstock
MME print
white, light aqua cardstock
scallop-edged scissors
Nesties circles
double-sided foam adhesive

Thursday, September 23, 2010

Sunset Spook Card

Here's another spooky post featuring Class A' Peel stickers from Stampendous, and some of their fabulous Pearl Glitter. A huge variety of their glitters, flocks, and embossing powders are now available in kits. These are an awesome way to sample the various colors, and they've already chosen the color scheme for you! The colors that I used on this card come from the "Moroccan Sun" Combo Kit. There is also a great mixed kit designed for Halloween called "Tricks and Treats". For this card, I applied Peel N' Stick to a cardstock panel, and after removing the top carrier sheet, I carefully placed the tree and bat stickers on the sticky surface. I poured the glitter in bands of color onto the remaining sticky surface. It helps to rub the glitter into the Peel N' Stick for better coverage. The card was created using plain black cardstock with an orange panel and an additional panel of EK Nostalgiques paper. I love this webby ribbon from Creative Impressions as it adds to the spooky feel.
Pam

Class A' Peel "Cats & Bats" from Stampendous (AC969K)
Sunflower Ultra Fine Pearl Glitter from Stampendous (GM357U)
Tiger Lily Ultra Fine Pearl Glitter from Stampendous (GM355U)
OR "Moroccan Sun" Combo Kit from Stampendous (CK07)
Peel N' Stick (FX70)
Festive Cardstock from Bazzill
Nostalgiques from EK
black cardstock
ribbon from Creative Impressions

Wednesday, September 22, 2010

Mojo157-NAUT(ilus) Your Average Birthday Card

Ssssh...don't tell, but this is my hubby's birthday card for next week. Amazingly, I actually got it done early! Somehow, I manage to get designs done for deadlines, but my own family somehow fall by the wayside. Kind of like the shoemaker's children who have no shoes. Now that I have a blog up and running, I really have less excuse for missing these big days. Anyway, my hubby loves nautilus shells and fortunately Dreamweaver Stencils just happen to have the most gorgeous shell stencils out there. I ran this shimmery copper cardstock through my Big Shot with the stencil, and ran the background stencil through again with the Bazzill Java cardstock. Spritzing a little rubbing alcohol on both sides before running through the machine helps to soften the paper fibers just enough to get a deep emboss. For this card I followed the Mojo Monday week 157 sketch ('cuz, hey, I might as well kill two birds with one stone...or card), which included a panel along the side using my cute herringbone patterned paper. Some type of circular item was supposed to be placed along the right side. I chose to use one of Tim Holtz' Tag Fragments, since it is clear and I didn't want to lose any of the detail of that beautiful embossed shell. I've had these rub-ons forever, and since I'm usually stamping or stenciling, I've never used them. This seemed to be the ideal opportunity, and the curve in the type fit perfectly. I chose antiqued copper brads as the three elements under the main focal point. I think he'll like this card. He'll love the stencil and the masculine feel accented by the hemp twine, plus the simple, clean design. Now I just need to work on an anniversary card for him as that comes up two days after his b-day. Got any suggestions?
Pam

"Nautilus" from Dreamweaver Stencils (LM104)
"Flourishes" from Dreamweaver Stencils (LJ890)
Bazzill Java Cardstock
Graphic 45 Proper Gentlemen Collection "Man About Town"
metallic copper cardstock
Tim Holtz Idea-ology Tag Fragments
brad fasteners from Creative Impressions
TLC Quikwords Rub Ons "Birthday Party"
brown hemp twine
Big Shot